A sublimation printer is a computer printer which uses heat to transfer dye onto different materials such as plastic and fabric.
So sublimation is actually the process of heat and thermal printing. Many of these printing devices are used for photo printing, mug and t- shirt designs, to name a few.
If you're looking to buy a dye sublimation printer for your business, home or studio, there are some salient features that you should keep in mind before choosing the most suitable model for you; which we'll look to cover throughout this guide.
For instance, if you have a label or sticker printing business, you should instead consider a vinyl sticker printer. Check out our detailed guide on buying the best printer for vinyl sticker printing, to help you choose.
Best Sublimation Printers: Our Top Picks
Here is the run down of all the best printers you can use for the sublimation of t shirts or mugs:
Best Dye Sublimation Printers for 2020 – Reviewed
Keeping these significant points in mind, please look into the best dye sublimation printers you can buy right now in 2020 which are not only the best in class but are the best performers in the industry.
Either you need to buy a sublimation printer for personal use or for commercial purposes, with each review we've included a list of features so you can ensure you're choosing the best printer for your needs.
1. Epson Artisan 1430 Wireless Inkjet Printer - Editor's Choice
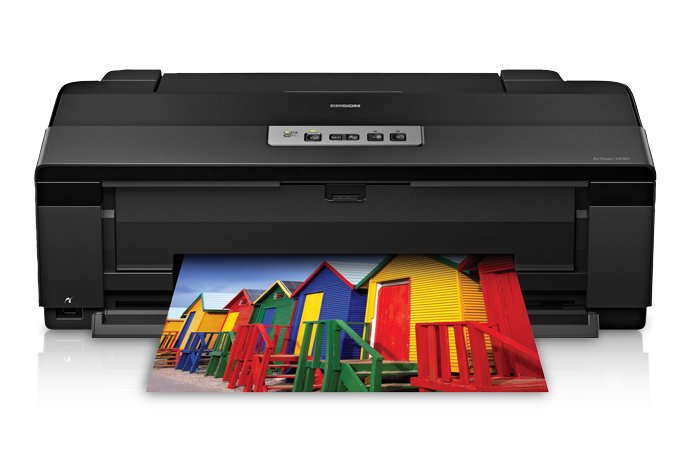
Epson Artisan 1430 is a wireless wide format color inkjet printer. This Epson Artisan 1430 is an ideal dye sublimation printer for t-shirts, mugs and more. The EPSON Artisan 1430 takes photo printing to the next level of performance and delivers brilliant, ultra high definition, high quality prints.
This printer can easily print up to 13″ * 19″ with border less printing. The awesome feature of wireless networking helps share your Sublimated prints with others.
EPSON 1430 uses Claria Hi Definition Ink which lasts up to 4 times longer than regular photo lab prints. The best part about this sublimation printer is that it creates photos which are smudge, scratch, fade and water resistant.
Now you can easily create high quality, professional looking large size gallery worthy prints and take your printing to new heights.
EPSON Artisan 1430 is the best choice among professional photographers, t-shirt and mug printers.
- Quickly connects to a wireless network
- Ultra hi-def prints
- Prints onto CDs or DVDs without the need for labels
- Able to print and share images from a smartphone
- Eco friendly features
- Border-less photo printing
- Only accommodates paper less than 10mm thick
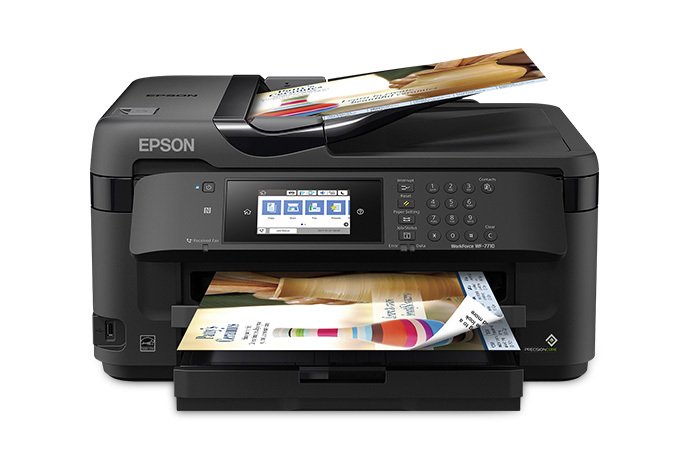
Epson Workforce WF-7710 Inkjet Printer - Best Multi-Functional Printer
The Epson WorkForce WF-7710 wireless and wiFi direct, wide-format color inkjet printer (2-sided auto duplex) is able to print from both tablet and smartphone devices, and is also AirPrint compatible. (C11CC99201)
Firstly, the Epson manufacturers designed the WF-7710 with an aim to enlarge small and innovative businesses for better productivity. It is a capacious inkjet, heat-transfer color printer that hosts “performance beyond laser”, powered by PrecisionCore.
By PrecisionCore, we mean that it uses a pristine printing technology wielding a high-density print chip. This new hi-tech print chip generates up to 40 million pinpoint dots a second with staggering accuracy, grade at substantial speed!
This EPSON gizmo can print up to a size of 13″x 19″ laser sharp black and color text. It has a freight age of a maximum of 500 sheets in the front, which is amazing and also contains a rear tray for printing on envelopes and special paper. You will be impressed by the automatic two-sided pre print mechanism.
Features:
- 4 DURABrite Ultra 252-series ink cartridges
- ISO print speed- black: 18 ISO ppm+ color: 10 ISO ppm+
- PrecisionCore print technology
- Hi speed, wireless, wired ethernet, Wi-Fi direct
WF-7710 is a useful inkjet printer which discharges print on your paper with the help of dexterous caliber inks available at reasonable prices which cost 40% lower than the laser prints.
The binary paper trays are a lot more useful than you think, printing continuously without any interruptions at high speed. Lets not miss out on the wireless attribute of the 7110.
It can connect, share and print from anywhere in the world through mobiles, laptops and even tablets.
Download the app and printing is just a click away! The best part about this printer is that its manufacturers have kept the environment in mind whilst creating it.
As it bears a number of eco- friendly features, such as:
- It consumes 70% less amount than radiation printers
- It's recyclable, RoHS compliant
- Saves up to 50% on paper with automated two-faced printing
- Waterproof and fade resistant properties
- Dispatches high-speed prints, with accurate dots
- Border-less coloring of large-sized papers
- Dual paper trays
- Reviews mention that the large size of the device is not suitable for homes
- Not so good at detecting printing size
3.Epson Stylus C88+ Inkjet Printer - Best Sublimation Printer for Small Business
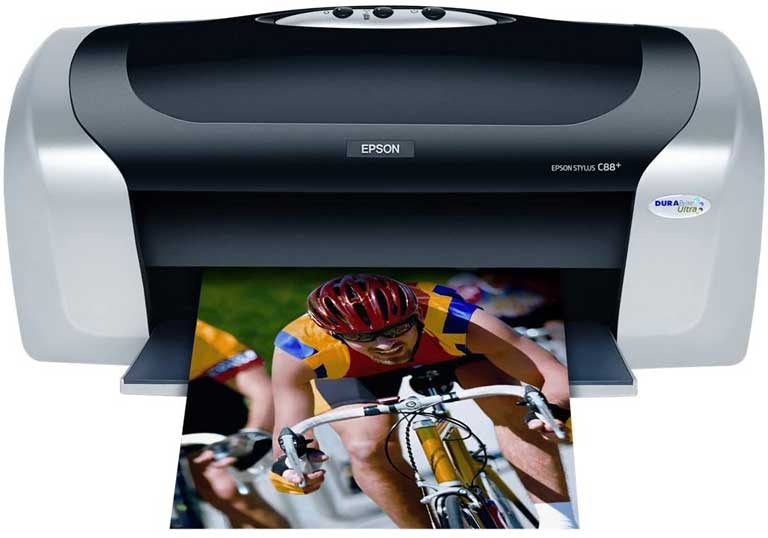
Another Epson commodity in the market that is intended for home use, Stylus 88+ Color Inkjet Printer is available at an attractively reasonable price under $100.
It performs very very efficiently furnishing powerful outcomes. The quality and grade of the pre-prints will stun you and the durability is also promising.
It uses the revolutionary DURABrite Ultra Pigment ink which dries instantly. This ink is known to be smudge, scratch, fade and water resistant. This is typically the kind of texture you desire.
The paper handling is automated and is reliable without causing any fuss. With an average speed of 19 pages per minute, it delivers border free printing within available frame-ready sizes.
PCWorld mentioned that the Stylus 88+ version of Epson is the only product so far that has been capable of printing 8.5″ wide banners and lengths that extend up to 44″.
Also it works wonders on photo printing although you will need to use a computer for this functioning. The makers of this product have also provided a software to create calendars, photo books and lots more.
- Can print long banners of 44 inches
- Reliable paper handling
- Strong, rich colour dispatch with instant ink drying
- Skin tones appear grayish
- Speed becomes slow while printing many photos
4.Mitsubishi CP-K60DW-S - Eco-Value Dye-Sublimation Photo Printer
The Mitsubishi CP-K60DW-S Sublimation Photo printer is a compact and decent color printer which uses thermal transfer to create stunning prints. The solid body and power saving features of this printer are notable.
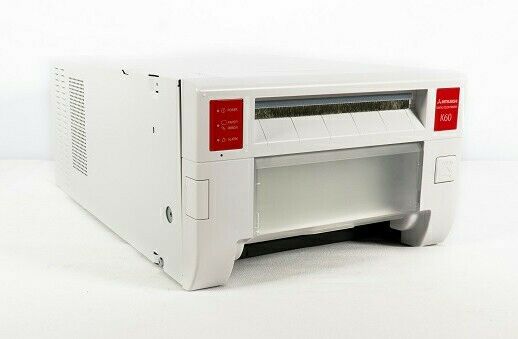
This printer can print high quality, vvibrant colors in a 300 x 300 DPI resolution. It can also print Instagram images easily which have an aspect ratio of 1:1
The digital image processing feature creates smooth and glossy laminated finish prints. The Mitsubishi CP-K60DW-S allows printing speeds of one print in 11.2 seconds for a 4 x 6 inches photo. Not only that, it can also print wide and large formats depending on your preference.
Another exciting feature of Mitsubishi CP-K60DW-S is the rewind function. This allows the ink rewind and rollback to optimize prints by resetting the ink ribbon. It helps in using the entire surface of printing so as to utilize the most of consumables.
- Fast and Simple Printing operation
- Prints in variety of sizes and glossy and matte prints
- Energy efficient and environmentally friendly
- Slightly bulky and heavy
- Some features might be too technical to set up for some users
5.Brother MFC-J995DW – Best Printer for Fabric Printing
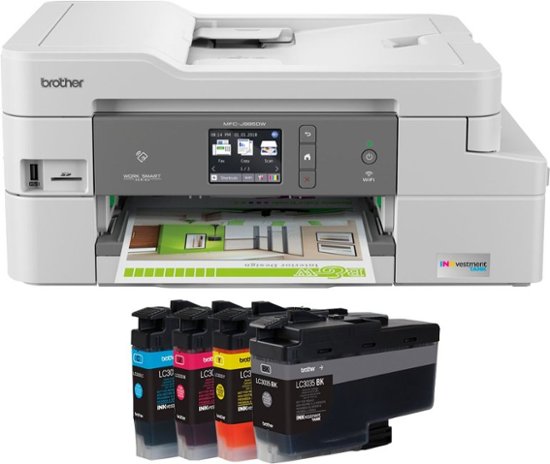
The Brother MFC-J995DW is a value all in one inkjet printer for home or small business users. This means it features a printer, a scanner and Fax at the same time.
The printer offers a good mix of productivity and convenient features which small business owners would love especially for thermal and heat press images printing.
Brother MFC-J995DW offers a low cost printing solution with high capacity ink cartridges.
Some of the salient features of the printer include the automatic two sided printing. It offers wireless printing and printing via Ethernet or NFC connections also.
It also has a large 2.7 inch touchscreen LCD which provides easy to use controls for your vinyl, sublimation or photo printing easily.
It also gives you an option to choose the fabric or material you need to print. You can print large glossy prints with well saturated colors and fine details with attractive textures of photos in just 4 minutes.
- Low cost per page expense
- Low cost Ink
- Pretty fast speed photo printing, scanning and copying
- Automatic duplex photo printing feature
- Mediocre color photo scans
- Special media tray is limited to one sheet only
- Automatic duplex function (ADF) doesn’t work on Copy and Scan
6.Epson Expression Photo HD XP-15000 - Best for Wide Format Printing
Epson Expression Photo HD XP15000 InkJet printer takes photo printing to a whole new level. It is a wireless wide format ultra HD ink printer which creates stunning photo printing on different materials and on paper.
Epson Expression Photo HD printer is an advanced and compact printer, which enables users to print brilliant, pro quality prints of up to 13 x 19 inches of border less printing.
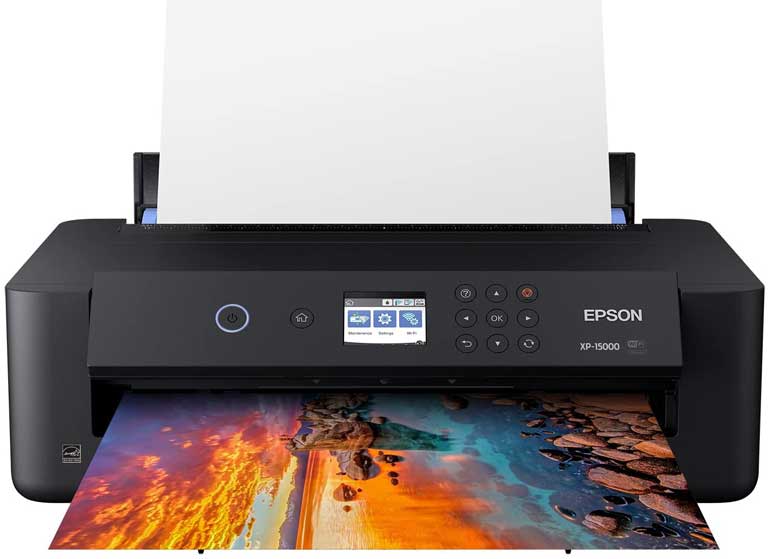
The Epson Expression Photo HD XP not only offers excellent color prints, it also enhances black and white prints with smooth gradations.
Image prints on the Epson Expression are very sharp and full of details. Thanks to it's ultra high HD resolution of 5760 x 1440 DPI.
The printing speed is quite impressive as it can print at speeds of 9 pages per minute of color prints and 9.2 ppm of black and white images.
It offers a 2.4 inches color LCD display and an easy access to USB for direct printing. Epson Expression Photo HD printer also offers wireless setup for printing via mobile or remote computer with a click of a button.
The printer supports Apple airprint, Android print, Google cloud print and Mopria Print service via mobile or tablet.
The printer uses MicroPiezo technology and 6 color HD ink set. It allows specialized media to be inserted in the rear 50 sheet tray. The printer is Environment friendly, RoHS compliant and recyclable.
- Automatic two side 13″ wide photo printing
- Professional Ultra HD photo quality with the help of 6-color Claria Photo HD Ink
- Ultimate and convenient wireless connectivity
- Can handle material of up to 23mm thick for sublimation
- Only Epson certified special designed ink can be used
- Limitation to work well on a few film surfaces
7. Canon Selphy CP1300 - Best Compact Wireless Printer
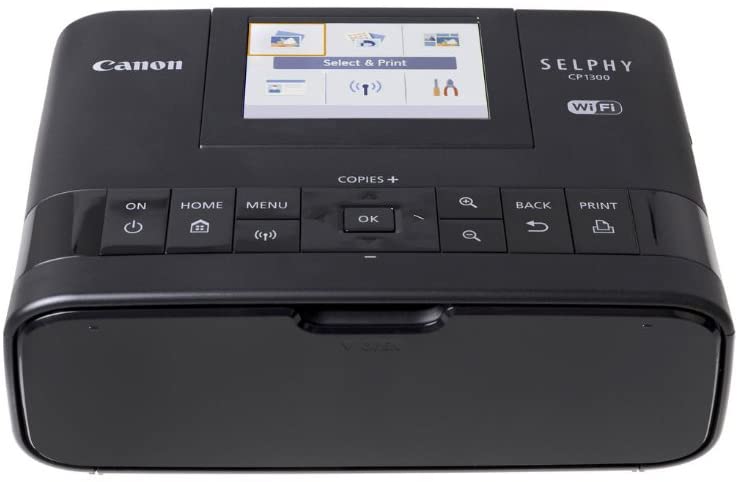
The Selphy CP1300 wireless compact photo printer is the perfect solution to portable printing, wherever you are. Whether that's at home, at the office or at the park the Selphy CP1300 allows you to print wirelessly through a number of methods, including: AirPrint, your camera's memory card or from your favorite social media channels, such as Facebook or Instagram using the Canon Print app, which is available for free from the Amazon Appstore.
You also have the option to print a small collection of your favorite photos in a fun collage format using the Party Shuffle Print feature, or quirky photo booth style prints. You choose the right style and size for your right photos including sizes: Postcard (4.0” x 6.0”), L Size (3.5” x 4.7”), Card Size (2.1” x 3.4”), Square Label (2.1” x 2.1”).
The Party Shuffle feature allows multiple devices to wirelessly send images to the Selphy CP1300 printer, via a mobile device. To which can then be combined into a single collage that you can print and share.
Finally, all these options are made easier than ever through the use of the handy 3.2" flip-up LCD color screen.
Features:
- Dye-sublimation print technology
- Compact power adapter
- 3.2" LCD screen
- Create fun collages using Party Shuffle Print
- Print in various sizes
- Multiple wireless and physical connections available
- Sleek, portable design
- Wireless
- Optional battery pack for printing on the move
- Water resistant photos
- Instantly dry photos
- Connect to your smartphone or tablet through the Canon PRINT app
- Print directly from USB, or your camera’s memory card
- Features 3.2″ LCD touch screen
- Customers having problems trying to print from the Windows Photos app
- Canon have been known not to support printing from newer PCs
8. Mitsubishi CP-D70DW - Best for Mass Photo Printing
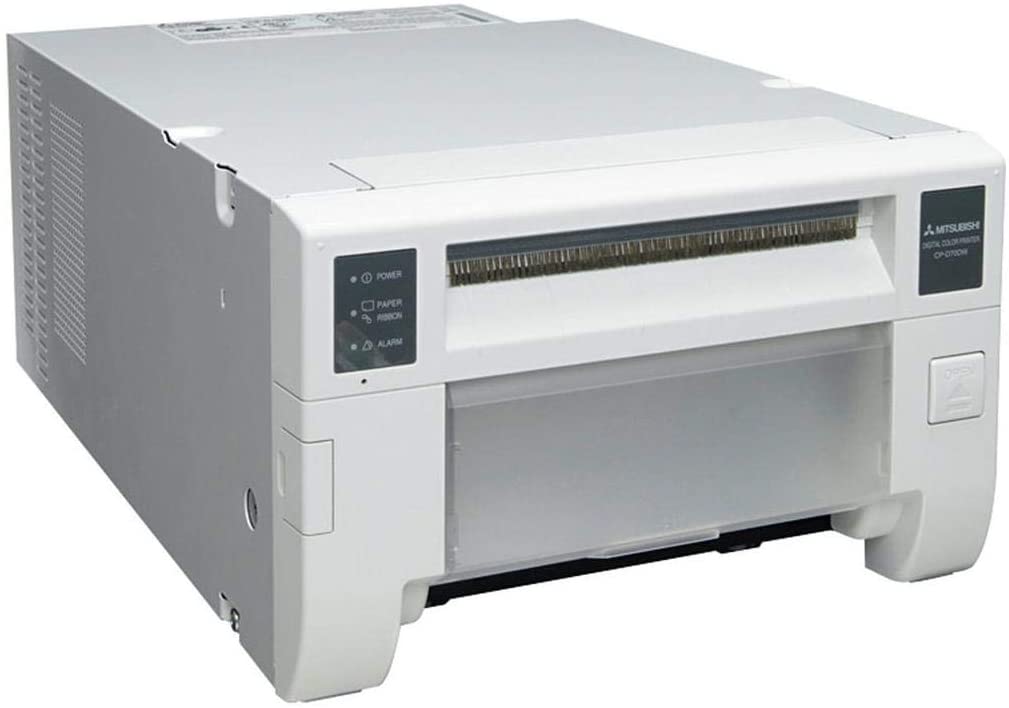
The Mitsubishi CP-D70DW pro-performance dye-sublimation photo printer is a professional, lightweight high capacity photo printer, which is capable of fast print speeds of just 8 seconds for 4x6" photo prints, producing Super Fine Matt finish output.
Printing is also available in a range of sizes, including: 2x6”, 3.5x5, 4x6”, 5x7, 6x6” and 6x8" while also offering a choice of Fine (high speed), Super Fine (high-res) or an ultra-fine print mode with no need for a change in media.
The Mitsubishi CP-D70DW also uses a new, advanced image processing algorithm which works to enhance the sharpness of each image, which results in high quality photo outputs.
Lastly, this printer has a number of built-in energy and efficiency saving features, including a unique cooling system that regulates the temperature
of the print head and internal power supply. Secondly, the energy saving mode allows for reduced power consumption.
Features:
- High capacity printing
- Compact, lightweight design
- Dust-proof housing
- Advanced cooling system
- PC/ Mac compatible
- Weighs just 26.5 lbs
- Dust-proof housing design
- Fast print speeds
- Fast print speeds (4×6″ prints in 8 seconds)
- Capable of super fine matte finish prints
- 3-year warranty with exchange during the 1st year
- Built-in energy saving mode
- No specific downsides
The Best Sawgrass Sublimation Printers
Sawgrass sublimation printers are solid digital decorating printers which provide vibrant HD images for sublimation and cotton transfer printing. They come in three variants namely Sawgrass Virtuoso VJ628, Sawgrass Virtuoso SG400 and Sawgrass Virtuoso SG800.
The virtuoso VJ628 is a high end industrial printer used for photography, arts and high volume customizations and personalization.
It can produce up to 24.5" width high quality prints. It uses DX7 print head which is proven to be an industrial grade technology which helps in better performance and longer life.
9.Sawgrass Virtuoso SG400 - Best High Resolution Sublimation Printer
The Sawgrass Virtuoso SG400 sublimation printer is quite popular for both personal and commercial usage as it is in a budget range. With a modern and classy look it is large with dimensions of 22" x 14" x 22" and weighs around 30 pounds. It comes with an ink panel named C, M, Y and K.
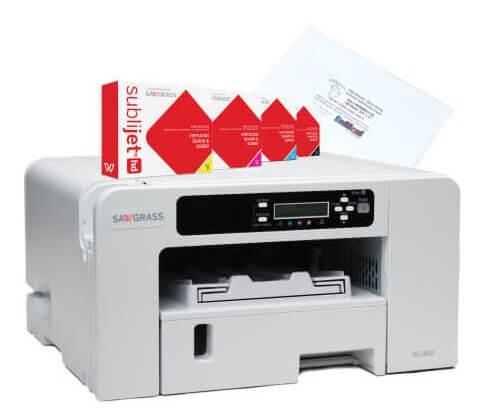
You get USB 2.0 and Ethernet ports and a bypass tray at the back of this photo printer just in case. SG400 photo printer is able to print high resolution and vibrant colored pictures of around 1200 * 1200 dpi.
With its solid build quality, it is capable of printing 34 pictures per hour for high resolution and 157 pictures per hour on 600 * 600 dpi resolution.
Sawgrass Virtuoso SG400 has the ability to print on a large variety of objects including and not limited to cotton shirts, tiles, glass, acrylic, polyester fabrics and plaques.
It also has self cleaning features so you never get clogged inks or any kind of jam. Thus you get faster printing speeds and great productivity while making no compromise on quality prints.
Unlike most of the dye sublimation printers available in the market, Sawgrass virtuoso printer provides you with 100 sublimation paper sheets, USB cable, flash drive for installing printer drivers, a manual and a set of ink cartridges for you to get started instantly.
After you run out of paper, it's your choice to choose between Sublijet HD paper or Chromablast.
Sawgrass Sublimation printers, especially the SG400 are your best bet for producing high resolution, high quality images on a wide array of materials.
- Specifically made for sublimation printing
- Ready made online stock library of images
- Comes with professional image editing software
- Expensive
- Costly ink
10. Sawgrass Virtuoso SG800 Sublimation Printer
Sawgrass Virtuoso SG800 left the industry awestruck by its first and fully integrated desktop system for sublimation. These are the only, exceptional and high quality printing machines that are constructed specifically for digital decorating.
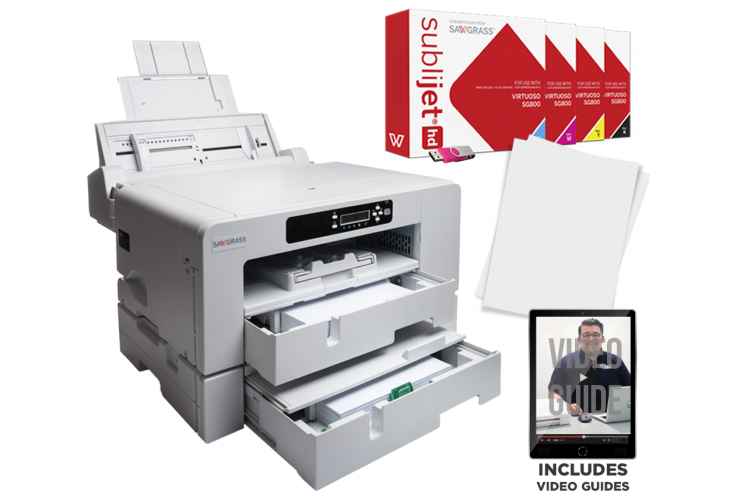
Sawgrass Virtuoso SG800 is a very advanced and ultra high quality printer which lets you print brighter and better higher-definition images carrying the art of digital, sublimation printing to the future.
With a faster throughput and slick, proficient form this sublimation printer is acing in the market for its gleaming resolution elevation and profit potential.
Another fresh feature is the Sublijet Ink which has greater yields. Purchasers are left jaw-dropping with the breathtaking coloring and accuracy.
Virtuoso Desktop HD Product Decorating Systems enables you to print images on a wide variety of products like aluminium panels, hardboard, tiles, mugs, glass, polyester fabrics, wood plaques and polymer coated rigid media.
Features:
- Fully integrated desktop system for sublimation
- Sublijet ink with high capacity cartridges
- 1200 x 1200 dpi resolution
- 250 Sheets paper deed unit
Well, the attributes don’t stop here. It gets even better with the accomplished standard of images with a high rate of output. Also, Sawgrass Virtuoso SG800 printer comes with a kit of the Creative Studio, providing Online Designer and Stock Design Library.
It gives you the liberty of creating your own designs and also provides a large number of templates and designs to choose from.
Also has the PowerDriver v4 Colour Management software for Corel and Adobe. With a tray expansion of 13 x 19″ and highest definition quality it dispatches masterly printed photos.
An inkjet printer that defines a whole new generation and has retained its position at the top ever since it has been in the market!
- No desktop graphics software and stock designs to buy – Saves a lot of money.
- Newly formulated ink with higher yield and 26% larger colour gamut.
- The only desktop inkjet printers built specifically for digital decorating.
- Faster throughput for greater productivity and profit potential.
- No specific downsides
Choosing the Best Sublimation Printer [Buyer's Guide]
Please make a note of these important hallmarks while buying a colored dye sublimation printer for your t-shirt, mug and other photo printing on different items.
- Price: You will need to be careful while buying a printer at an affordable price which is efficient and qualitative at the same time
- Quality: The quality of the ink as well as the way in which the printer ejects color on the material is quint-essential
- Uses: The sublimation printer should be able to serve a wide range of functionalities at a significant standard
Sublimation Printing vs Heat Press Printing
Many people think that sublimation and heat press are the same. However, there are some slight differences, we think we should make that clear.
For instance, heat press printing uses heat and pressure to apply prints to t-shirts. While in sublimation printing, different dyes are printed on a transfer medium with the help of a high quality inkjet printer.
The sublimation dyes are then transferred to sublimation papers onto the desired object with the help of a commercial heat press.
Frequently Asked Questions [FAQ's]
Q2. How much does a sublimation printer cost?
Q3. What is the best printer for sublimation?
Ans. We have analyzed all the available sublimation printers and have concluded that the Epson Workforce WF-7110 is the best sublimation printer. It is a high quality, affordable wide format inkjet printer which can print sublimation paper sheets of up to 13 x 19" inches.
It also has a very high resolution of 4800 x 2410 which ensures high quality image printing, and can also be used for heat transfer purposes too. It also has a large 250 sheet tray, which is enough for large scale printing productions. Making the Epson Workforce WF-7110 a great choice at under $200.
Q4. How long does sublimation ink last?
Ans. A common question we hear a lot is; how long does sublimation ink last?
Well, being a liquid ink sublimation inks have their shelf life. Keeping them in the printer for prolonged periods of time will cause issues such as; head clogging, banding and color shifting. Although, most quality sublimation inks can be used past their expiry date. It's always advisable to use the ink within 6 months of installation.
Q5. What t-shirt materials are best for sublimation printing?
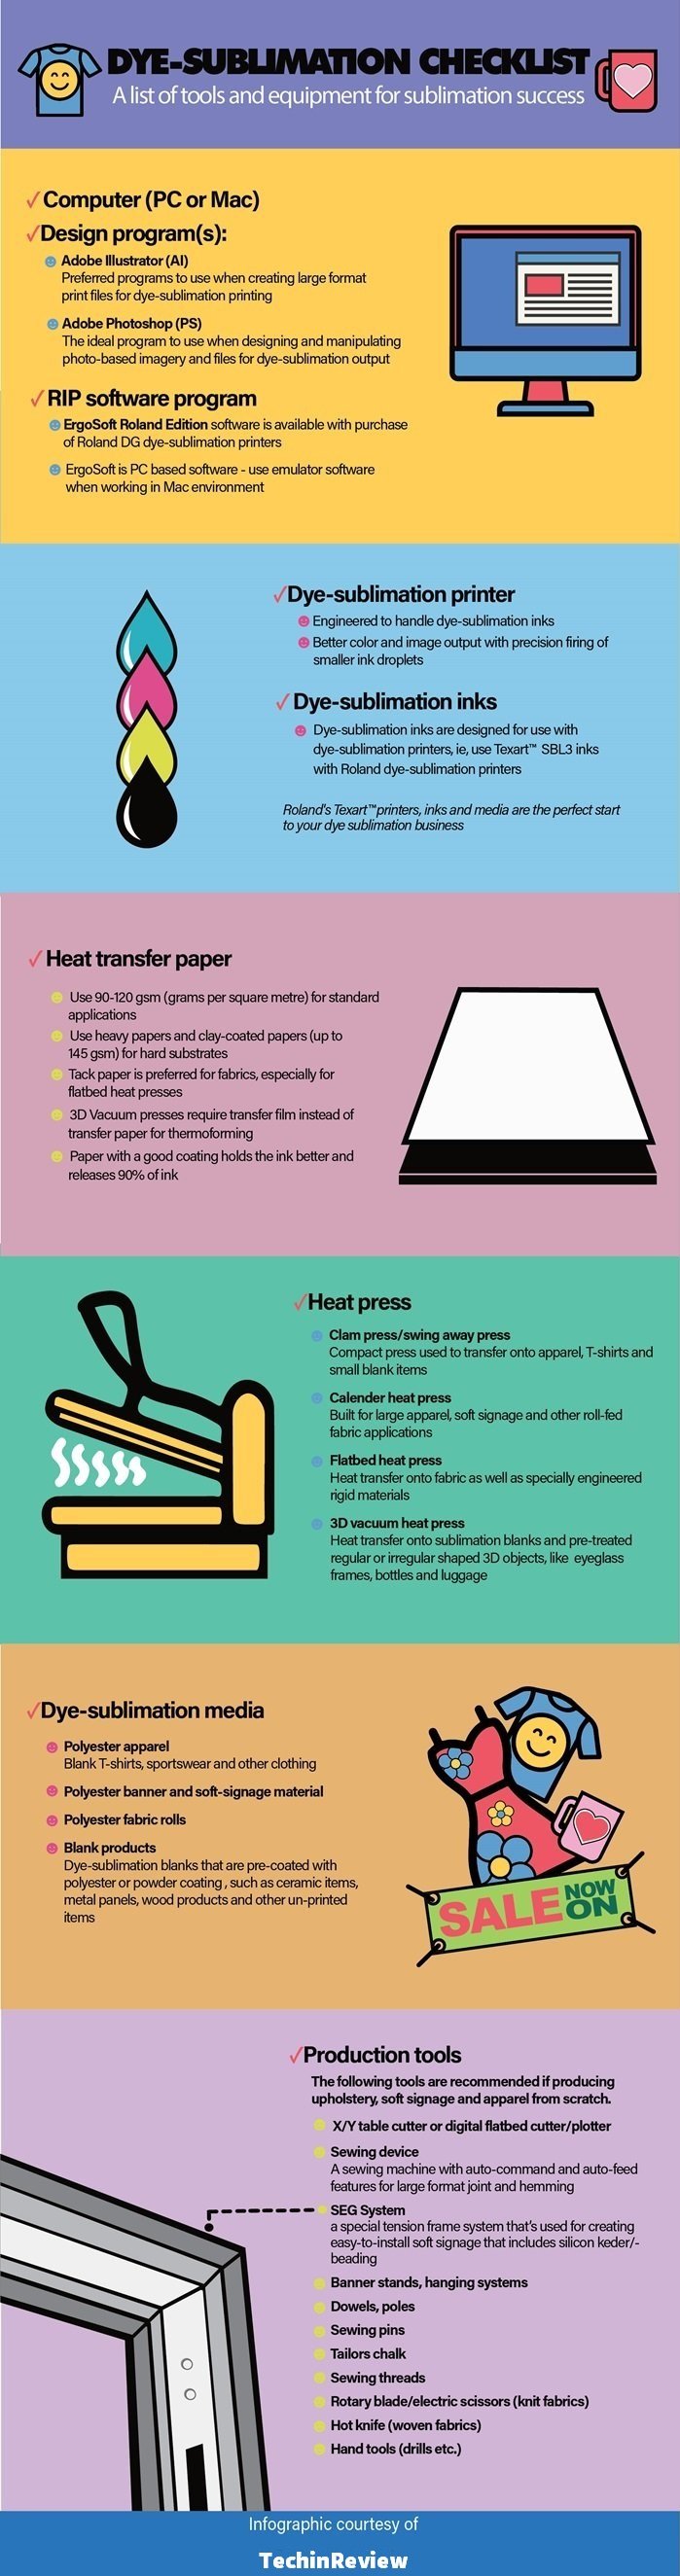
Dye-Sublimation Printing Checklist
Here, we've provided a list of tools and equipment needed for the sublimation printing process:
- the design programs used for sublimation
- dye sublimation inks
- heat transfer paper
- specification of heat press to use
- media to apply your sublimation onto
See our infographic below and let us know if you find it useful in your dye-sublimation print process.
How to Sublimate a T-Shirt: The Sublimation Process [Step by Step]
In order to make full use of the sublimation printers we've recommended above, you'll need to know the correct process of sublimation printing.
As costs for resources such as ink cartridges, paper, software and transfer media can be expensive, it's best to get the process right the first time, so you're not wasting too much in terms of resources and money.
Setting up your Software to Print
We'll start the printing process on the computer, to help guide you through the correct setup for the software system we'll be using.
For this example, we're using Silhouette Studio so bare in mind that these instructions may differ slightly, depending on the type of software you're using.
Firstly, what we need to do is open up a new document. Once doing so, it's likely going to look something like this.
Secondly, you'll need to simply drag in the design that you're wanting to print, from where it’s located on your computer, into the software window.
Ideally, you're going to want an image with a transparent background, with a minimum resolution of 300 DPI (dots per inch), which is the resolution, anything less than that and you're going to see a loss in image quality.
Then we want to set up the image to print. With t-shirts, a size of 11 inches wide usually works well. So i'd suggest sticking to that, especially if you're printing for the first time.
To do this, simply click into the 'Transform' window and adjust the width to 11" within the ‘Specify Dimensions' panel. A top tip is to ensure that the aspect ratio is set to 'locked' to prevent your image from becoming over stretched before adjusting these dimensions.
Then we're going to want to go back to the Page Setup menu, and we're going to turn the ‘Cut Border’ off, but make sure that the ‘Show Print Border’ is ticked. This is important, as it’s going to tell you what part of the image is actually going to be printed.
For instance, in the example below everything outside the border won't print. Despite there being plenty of space, it will not print any parts of the image which is outside that border. So, this border is going to tell you if you're going to need to adjust your print settings.
Now, since this is 11 inches wide, we need to print on a 13x19” sheet of paper, so that it prints the whole image. So, we are going to set it up for 13x19”. Personally, I only keep 13x19” and 8.5x11” sublimation paper. But there are lots of different sizes that you can buy.
So, to set this size go to File > Print, and select your printer from the list, then select Preferences.
For the printing preferences, you’re going to want to select Paper Cassette 1 as the Paper Source, then select the document size of 13x19”. I select the Orientation to Portrait, but you can change this to whatever you like. Then, go to Paper Type and select Premium Presentation Paper Matte. Then go into Quality and select High from the dropdown.
So, the second tab. This document size is going to just automatically match what you had on the first tab. For the Color Correction, you want to go into Advanced and hit ICM. That's the internal color profile for the printer itself, which is the default.
It's going to let it use the settings that Epson has set for the printer, without having any special changes being made by the software. So, turn on ICM and then, turn off High Speed, and turn on Mirror Image.
By turning on Mirror Image, it's going to automatically mirror it for you so you don't have to do it. With sublimation, it needs to be mirrored, since you put the design face down onto whatever you're printing it onto, which in our case is a t-shirt. If you don't mirror it, everything will be backwards. So, I’d highly suggest selecting that.
So then select Okay. Then Apply, but then you hit Cancel, as we don’t want to print yet.
Now, you should be presented with your image and if you have set it up correctly, you should see that the print border has been adjusted and your image should be within the print border. This is exactly why we suggest turning the print border settings on.
So, now we want to select and drag the design all the way up to the border. You can also click ‘Center’ from the Transform panel, so that it's centered on the paper, plus it just makes placement easier when it comes to laying the design onto your shirt.
Once you’ve got the design where you want it, go back to File then Print, but before selecting Print make sure your printer is set up first. We’re going to show you how to do that in the next section.
Setting up your Printer
Okay, now we need to set up the printer to ensure that it’s printing the correct design that the computer is going to send it.
Since we're doing the bigger sheet of paper, pull out the tray, and you should see a series of blue tabs, these allow you to adjust the size of the tray, where your paper is going to go.
Pull the tab and it will let you extend the whole tray out. Then you need to make sure that all the tabs are pushed back to as far as they go, so you have the full tray size for the 13x19” paper.
If you're using a different size, just look at the lines on the tray and line them up accordingly. Firstly, push the paper all the way up to the top of the tray.
I'm using A-SUB Sublimation paper, which you can get on Amazon, it works great. You’ll notice that there’s a pattern on one side, you want to print on the plain white side. So put it face down, so that the pattern is on top. Then you’ll know you have it loaded right.
Once you’ve done this, push the tray back in, then you need to tell the printer what size paper you're loading.
Adjusting the Printer Settings
Select 13x19” on the printer. You’ll notice that 13x19” is actually called Super B (A3+). So, for the Paper Size option, choose Super B (A+) and for Paper Type choose Premium Matte, then select Close, and you should be ready to go. Then, all you need to do is click Print from your computer.
Preparing your T-Shirt for the Heat Press
So once the transfer was printed. One more thing I wanted to mention is to make sure that you use a lint roller on your shirt before putting it under the heat press. Although you can’t see it, there's lint that gathers on it in the factory, which will show up blue after you press it. So, lint roller the front, lint roller the back. Go through a few sheets if you must, just to be extra careful.
The Heat Press Process
Okay. So now we can move onto the heat press process. I do all my shirts and fabrics, 400 degrees for 60 seconds. I highly suggest checking the temperature of your heat press, to do this you can use a little infrared thermometer which you can get from Amazon. Simply point it at the platen and press the button to get a reading.
It depends on where you shoot the thermometer on the platen, the temperature is going to vary a little bit here and there. But so long as it’s around 400 in the middle, you’re good to go.
Laying out your Design
Firstly, I use foam to lay my shirts on top of, in the heat press, which gives it a nice soft backing. Plus, you can get an even pressure without having to set a really high pressure, and it allows for the seams of the shirt to sit off the foam pad and not get crushed.
So, what you want to do first is get some butcher paper to sit on top of the foam pad and cut a piece that's big enough to cover the whole bottom platen, you can also reuse this so don’t scrap it once you’re done.
Now, cut a new piece to cover the top of the shirt, to protect the shirt itself, so it doesn't get scorched.
The very first thing I do is I pre-press the shirt to dry out any initial moisture. So, take the shirt and lay it out. As we mentioned before, make sure that the seams from the t-shirt are above the edge of the foam, so they're not going to get smashed by the press.
Then take a piece of butcher paper, and put it over the t-shirt, and close the press for a couple of seconds. Then, pull it out and set it aside.
Preparing the Transfer
To ensure that the transfer is ready for the heat press, we need to spray adhesive onto the transfer. I’d suggest using a cardboard box to place the transfer in, so you can then spray it without the foam going everywhere. So firstly, put the transfer inside the box. Then, with the adhesive spray, hold the spray for a couple of seconds to make a cloud inside the box.
Then pull it out and check for any drips on the design, those drips will show up when you press it. So, ensure that the transfer has a nice fine mist over it, with no excess moisture.
Okay so going back to the shirt. We’ve pre-pressed it, so take your sticky adhesive transfer, lay it face down on your shirt and line it up with where you want the design to go and press it down onto the shirt.
So, here's another really important part that'll save you from messing up a shirt; you’ve got to remember to put paper inside the shirt, on top of the shirt, and under the shirt. Because you can sometimes get ink bleeding through the shirt and onto the back. Plus, I like to try to save the butcher paper and reuse them. So, I use cheap legal paper for this.
So, take your legal paper, and put one on the press where the design is going to be and one inside the shirt. Then, you need to grab the paper that’s inside the shirt, pick it up and place it onto the heat press.
Once your design is on the heat press, make sure that the foam is underneath your whole design, otherwise it won't press. You need to get good contact between the shirt and the press.
Then, place a sheet of cheap legal paper over the top of the design. This will save the butcher paper from getting covered in ink. Finally, cover the whole shirt with your butcher paper.
Heat Pressing the Design
Remember, we want our heat press to be at around 400 degrees, for 60 seconds. So, pull the heat press down onto the shirt and wait 60 seconds.
Note: If you have a shiny polyester shirt, I’d suggest putting two or three sheets of butcher paper over it.
So once the time is up, lift the lid up slowly, because it is going to want to suck your paper up with it. So first, pull off the top sheet.
Peeling the Transfer
Okay, so peeling off the transfer. Be careful when doing this, as the t-shirt is still going to be hot. If you need to, wait for it to cool down a little. Nevertheless, once it’s cooled down a little, hold it down with one hand and grab the corner of the design and then slowly peel it back on itself. Just make sure it doesn't shift while you're doing it.
Once you manage to peel it off, pull the paper out the middle and take it off the heat press.
Once it’s off the heat press, while it's still hot, run the lint roller over the entire shirt. As it will help lift up any loose fibers while it's hot. Finally, shake the whole shirt out.
If you’ve followed this process as I’ve shown you, you should see that the design is baked right into the fibers of the shirt and should be smooth to the touch.
So that's it. Beginning to end on how to sublimate a t-shirt. If I had to give one piece of advice, it would be not to rush through it as it’s easy to make mistakes. Just practice and you’ll become more and more confident each time you come to do it.
Conclusion
From the list of sublimation printers we've covered within this review, we hope you're able to find one which meets your needs, whether that be commercial or personal use.
Personally, if we had to recommend one printer for any budget, it'd be the Epson Workforce 7710, as we really enjoyed the fact that you're able to print directly from both tablet and smartphone devices. Secondly, speed is also a great feature of this printer. Making it an ideal choice for small to medium businesses, as it would be sure to increase their level of productivity, increasing their bottom line.
Nevertheless, if you have a question about any of the printers listed above, or if you feel we may have missed one feel free to leave a comment below and we'll get back to you.


